Home » Posts filed under how to
Posted by
marco
Here's a very helpful tip for you all, which is how to lock your files using Easy File Locker, Easy file locker is a freeware for us all, remember the old days when you always finds it hard to hide your private files from everyone else accessing your PC? You have probably tried making your files hidden, or make as much folder as you can so that no one could find where you have hide your private files, but to no avail, they could still find those files of yours, well this might be the perfect solution for you as it was free, this is how to lock your files using easy file locker, the freeware.
 |
| How to Lock Your Files Using Easy File Locker |
Serves to lock a file and to limit whoever can view or open your file later, easy file locker is the name of the application that can make it happen. This application is not only used to protect a folder, but easy file locker can also lock the folder and all sub directories below it.
The type of protection is applied by using the Easy File Locker including a file or folder that can be set and can be seen (visible) or can be Accessed (accessible), can write on (writable) or can be deleted (deletable).
The steps are as follows:
1. Install the application and run as usual.
2. Click the menu System > Set Password.
 |
| How to Lock Your Files Using Easy File Locker
|
3. Fill out a password > OK.
 |
| How to Lock Your Files Using Easy File Locker
|
4. Now you can find the file that you want to protect using this easy file locker, then click on Edit > add file or you can also directly access it in the toolbar that bearing the plus sign (+).
5. Click the button on the right side of path to find the file.
6. Select the file you're about to protect > Open.
7. After that you will be shown your files, Check on the options accessible, writable, and deletable > OK, and then click the OFF button to start hiding.
 |
| How to Lock Your Files Using Easy File Locker
|
8. Now you'll see that the file you are protecting will not be visible anymore, like it's gone, but do not panic, because the file is only in the hide state, you can still open them yourself.
9. If you want to make the file visible again, all you need to do is open Easy File Locker and then press the ON button.
Easy? Very easy i should say, and it's free too. It's definitely a very practical way for everyone, anytime, and anywhere. Easy file locker also has a very small size, it will not let you down, believe me.
The official website for download http://www.xoslab.com/efl.html
The file size is only about 307 kb.
 |
| Easy File Locker
|
That is the way to do it, that is how you lock your files using Easy File Locker, easy, right? it's really not a hard thing to do if you give a little effort in searching for the best solution for your problems, but you just won't do it do you? If that's the case then let me do it for you, just bookmark this blog, and ask me for help and i will kindly find the solution for you, i'll do the search, googling you might say... in the mean time i presents to you this tips on how to lock your files using Easy File Locker.
More about → How to Lock Your Files Using Easy File Locker
Posted by
marco
This is the ultimate ways to cheat the long waiting of each time opening a website, this is How To Open Mobile Version of A Website In Firefox.
There are several times when you may want to test out a mobile website, or use mobile websites to save bandwidth, since they load pretty fast and do not use heavy images, which in turn can use up more bandwidth from your ISP.
However many mobile websites redirect users back to a regular website, when you visit it using browsers such as Firefox, Google Chrome, Opera or Internet Explorer.
If you are looking to test a website or save some bandwidth while surfing your favorite social networking site, a simple Firefox add-on could help you emulate a mobile web browser and let you surf the website, like you would do in a actual mobile web browser.
The trick involves changing the user agent string, that is sent out to website, to make them think, that the request is coming from a actual mobile web browser, you can practically emulate default system browsers from any phone.
Steps To Emulate A Mobile Web Browser In Firefox
 Step 1: Download the User Agent Switcher Add-on for Firefox
Step 2: Restart Firefox for the add-on change to take place.
Step 3: To emulate a mobile web browser, you will need to change the user agent string that is sent out, we recommend finding a appropriate user agent string from this huge list of mobile browser strings.
Step 4: Once you have identified your favorite mobile browser string, go to Tools > User Agent Switcher > Options > Options in Firefox.
Step 5: In the options window for user agent switcher, select User Agents and click on the add button.
Step 6: In the new Add User Agent dialog box, give a appropriate name to the user agent and copy the user agent string you got from step 3 into the second text box, for example we are creating a user agent string for iPhone, so we named it as iPhone emulator and added the default user agent for iPhone in the User Agent text box.
You can leave the other options provided as blank, once you have entered the details, click on the Ok button.
Step 7: To start a new browsing session using a emulated web browser, go to Tools > User Agent Switcher and select the appropriate mobile web browser you want to emulate, to switch back to normal browsing, just select the default option from the same menu.
This tip will help you to browse mobile web sites or test them out from your PC, however this trick cannot be used to test out mobile applications, that require you to install something to the mobile phone, however you can still use this How To Open Mobile Version of A Website In Firefox trick and save on bandwidth too, ciao ^_^
More about → How To Open Mobile Version of A Website In Firefox
Posted by
marco
So How do we use VMware tools to Install Windows 8 on VMware software?
This article will help you install windows 8 on VMware software using VMware tools. The whole installation process takes only about 10 minutes depending on your computer and resources available for virtual machine. The Windows 8 installation process is straight forward and you can choose default options or select obvious settings. It will ask for a Windows 8 product key which you can skip and choose to provide it later.
The Windows 8 Developer Preview is a preview of what an operating system is expected to look and feel like once development is complete. While you may be months or even a year away from seeing the release version of Windows 8, you can still take advantage of this program for a quick glimpse of what is ahead.
For users who switched away and for those also who stayed away through Windows Vista and Windows 7, Windows 8 marks one of the most significant user interface changes. Like Windows 3.11 gave way to Windows 95. The Start menu is entirely different, and the user interface is geared towards a blend between traditional and touch-based applications.
Step by step 10 instructions on how to install Windows 8 on VMware Software:
1) Download Windows 8 installer from the official Microsoft Windows website.
2) Install VMware software. The installation is a straight forward process. During installation, you will have to provide the VMware product key you received in the email.
 3) Launch VMware software. You can find the shortcut to launch VMware software on your desktop or start menu.
4) Create a new Virtual Machine by clicking on the appropriate link in the welcome screen or in the File menu.
5) When you create a new virtual machine, choose the option "I will install the operating system later."
The option to install from the Windows 8 installer ISO image may not work since VMware cannot recognize the Windows 8 operating system yet.
6) Choose Windows as the operating system. Since you will not find Windows 8 in the list, choose Windows 7 or Windows 7 64-bit, whichever is appropriate. Choose the default options or appropriate options in all other screens.
7) After you complete creating the new virtual machine, VMware will open the new virtual machine with a blank screen.
8) Click on the "Power on this virtual machine" option. It will try to boot the virtual machine. However it will fail to start the operating system since there is no operating system installed yet.
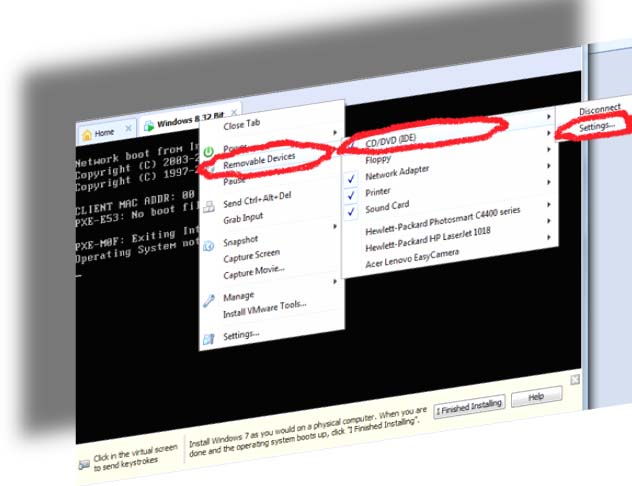
9) Mount the ISO image as DVD drive and install Windows 8 from it. To mount the Windows 8 ISO image, click on the tab for your virtual machine in VMware window and select "Removable Devices" à "CD/DVD (IDE)" à "Settings".
10) Click on the “CD/DVD (IDE)” option on the left side. On the right side, choose the option "Use ISO image file" and select your Windows 8 installer ISO image file.
You are all set to install Windows 8 on the VMware software. All you have to do is click on "Restart VM" at the bottom of the VMware software screen and it will restart the virtual machine and boot from the Windows 8 ISO image.
Now that you know how to use VMware tools to Install Windows 8 on VMware Software, why don't share this amazing tips to our friends, it's just a click away.
More about → How to Install Windows 8 on VMware Software
Posted by
marco
This is just a basic and simple method on How to Unprotect an Excel Sheet, yes, you read it right, while lots of people thought it was hard, it turn out to be very easy thing to do.
Unprotecting an Excel sheet is surprisingly easy. If your Excel sheet is password protected and you do not know the password, there is no way that you can unprotect the sheet in that particular workbook – but you can create a new workbook which will contain exactly the same formulas, formatting and values that will not be protected and will be editable.
How to Unprotect a Non-Password Protected Excel Sheet
Open up the Excel document.
Click on the “Review” tab.
Click “Unprotect Sheet” or “Unprotect Workbook.”
How to Unprotect a Password Protected Excel Sheet
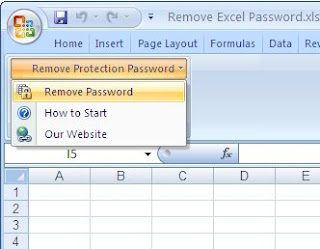
- The first way to do this is to copy and paste the contents into a new workbook. This sounds very simple and is very simple but most people do not even consider this option due to its simplicity.
- In the case that your Excel sheet is password protected and you cannot select the cells on the Excel sheet, you are going to need to make use of a web-based spreadsheet solution – namely Google Spreadsheet.
- Upload your spreadsheet into Google Spreadsheet.
- You can now already edit the file, from within Google Spreadsheet. If you wish to make a copy that you can also edit in Excel, simply export the spreadsheet into an .xls file. Simple.
How to Remove Protection from an Excel Sheet using Google Docs
Another way to remove protection from an Excel sheet without the password or access to the document creator is to import it into the Google Docs Spreadsheet program, which will remove protection once the document is imported.

Step 1 – Create a Google account at gmail.com or use an existing one.
Step 2 – Log into Google Docs with a google account at: docs.google.com by entering a login name and password.
Step 3 – Click “Upload” then the “Select Files to Upload” option on the subsequent window.
Step 4 – Use the Google file chooser to locate the spreadsheet file to be uploaded and that protection will be removed from.
Step 5 – View and edit the data file after it is successfully imported into Google Docs.
So now you know How to Unprotect an Excel Sheet, it's pretty easy, right?
More about → How to Unprotect an Excel Sheet
Posted by
marco
This is How to Designing Your Own House With Sweet Home 3D
For fans of the game build a house like The Sims, then it will not feel alienated by this game. Sweet Home 3D is an application that shows users the ease of using an application to support us in making the simulation of a home interior design. The application is in addition easy to operate, are also easily obtained.
Download the application will not be difficult and the file size is also not large. To face the problem of Sweet Home 3D is simpler when compared to similar applications such as 3dsmax. It is targeted for users of these applications are ordinary people that do not require a lot of serious learning to operate it.
Sweet Home 3D is designed specifically for interior design enthusiasts and for users who do not go into interior design scholarship itself. So for someone who does not understand interior design at all able to use and operate these applications and get a house or a room design form desired. Another convenience offered by this application is easy to download data from the application program. This application is still not traded and is still free if you want to download.
In addition, if the furniture or furniture that is in the application it is less, then the user can download or add to the other furniture in http://www.sweethome3d.eu/importModels.jsp. there are over 200 models of furniture that can be used to embellish the design house or a room that has been made.
 In appearance, Sweet Home 3D using 3-dimensional, so any changes that users do on the plan can be instantly displayed virtually. There is also a plan view showing where the user can draw and put the furniture and equipment available. To fill the room or home furnishings catalog has been provided which has many kinds of furniture and can still be added if it is felt that existing furniture does not meet the wishes of the user, and also on the interface displayed on the dimensions of the furniture that has the user select so as to adjust with precision the user want.
Here are some sample screenshots of the 3D Sweethome.
- Here's a screenshot when we start the application Sweethome 3D
- This is the types of equipment / furniture that we can put our house in the model.
- Picture above is a detail of the furniture that we put in the model, which contains the length, height and width.
- And the picture above is a picture of model homes are almost completed the process
With the free modeling applications like Sweet Home 3D it is very easy for ordinary people to be creative to design homes or places as they want, with 2D or 3D models. So, if you have a dream to have your own home and with your own design, you could just try Designing Your Own House With Sweet Home 3D.
More about → Designing Your Own House With Sweet Home 3D
Posted by
marco
This will tell you how to Type symbols such as ► ™ ♥ ♦ ♣ ♠ ◄ on windows.
Basically when you type in anything into the computer, it reads the ASCII characters that we input and it interpret it to the computer screen as a character. but there are some characters that may not have known the following is a list of ASCII table:
how to use them is as follows:
as an example we will create a character ™
Hold down the ALT key in the keyboard
Pressing the code number 0153 on the numlock on the keyboard
Release the ALT key
Thus other characters can be seen in the image above as your example.
Note:
for laptop users, the way life
first turn numlock button by pressing the Fn + NumLk
usually available (at least on my laptop), then use it as in this order for each number:
J = 1, K = 2, L = 3, N = 4, I = 5, P = 6.7 = 7.8 = 8.9 = 9, M = 0
if you want to turn off the numlock just press Fn + NumLk.
Copy or save the image so that you could always insert the above code as you already know how to Type symbols on windows.
More about → How To Type Symbols Like ► ™ ♥ ♦ ♣ ♠ ◄ On Windows
Posted by
marco
This is how you capture screenshot of the entire webpage with awesome screenshot extension
Sometimes when surfing the internet, we find some interesting website. To capture, we often use the Print Screen function from windows. But what if the website has a rather long single page.
Here's what we're gonna talk about, it is Awesome Screenshot. Not only to capture the whole web page, but its plug-in also has an added feature annotations in the screenshot.
Pros of awesome screenshot extension:
+ save full web pages (especially if it's a tutorial, need be stored in your flashdrives) so that you can read it again anyday,+ posting screenshots in the web that is difficult to copy and paste (for example status updates and comments on facebook or twitter)
Here's how:
- Use the Google Chrome web browser. Link download: http://chrome.google.com/ http://filehippo.com/download_google_chrome/- Install extension "Awesome Screenshot" through http://chrome.google.com/extensions/
To search for such extension, just search "awesome screenshot"
select awesome screenshot
click install
wait until the download is complete
and install
***
Capture entire web pages with Awesome Screenshot at Google Chrome:
To use it, visit the website that you want to capture and click the "Awesome Screenshot" and select Capture Entire Page (note at the top right)
The results will be like this
***
Use of tools for editing web pages on Awesome screenshot Screenshot:
Crop (Crop a portion of the screenshot) -> u can choose a part of a page you want to keep
Rectangle
Eclipse
arrow
line
Free Line -> line at will
blur
text
Color Picker -> select the colors for Text
Undo -> really useful when needed
When you have Capture Entire Webpage Screenshot With Awesome Screenshot Extension, you can do all you want with it.
More about → How To Capture Entire Webpage Screenshot With Awesome Screenshot Extension